Saturday, June 28, 2008

Fully lining hats with polar fleece

click any illustration to enlarge
Lining handknit caps with polar fleece is a good trick to know. (Click here for further information about polar fleece.) Lining with polar fleece can make too-big hats fit, and it eliminates wool itchiness from sensitive foreheads.

TECHknitting blog has already shown how to line knitted hats with polar fleece headband style; today's post shows how to fully line a hat. Basically, with this trick, you make another hat of polar fleece, then sew that inside your knitted hat. With a lining in a heavy weight of fleece, the hat will be suitable for arctic expeditions--excellent where I live (Wisconsin)--but in more temperate climates, you may want to search out a thinner fleece for your lining so the hat won't be impossibly hot.

Step 1 (below): Polar fleece stretches more from selvedge to selvedge than along its length. Cut out a strip from the "wide" way on the fabric (as shown by the "direction of stretch" arrow). The strip should be approximately 10 or 11 inches high and 24 to 26 inches wide. This strip will become the inner lining hat.
Step 2 (below): Wrap the strip around the intended wearer's head with the "not-so-good" side facing out and pin it shut. It would be wise to wear the pinned strip around the house for some time--what seems comfortably snug on first pinning can come to feel ear-numbingly tight after extended wear.
Step 3 (below): Sew the tube shut as pinned. If you have a serger, use that. With a sewing machine you can sew a simple straight seam. If you are sewing by hand, use the back stitch.
Step 4 (below): Trim the excess from the seam. The illustration shows pinking shears, but you can trim with ordinary scissors. Polar fleece does not unravel, so you can trim closer than with woven cloth. An approximately 3/8 inch seam allowance is good, but bold souls can trim as close as 1/4 inch, while nervous sorts can trim to a standard 5/8 seam allowance. If you do have a sewing machine, you might wish to re-sew over the cut edge with the machine's zig-zag or overcast stitch, but this is not necessary.
Step 5 (below): Have the intended wearer try on the tube. Pull the tube down well over the forehead so that you don't accidentally make the lining too shallow. Pin shut the top of the tube so that it comfortably conforms to the shape of the wearer's head. Below is an illustration, and at this link is a photo of the process in real life (Ravelry link).
Step 6: Just as you sewed the back seam of the tube in step 3, so now you will sew the top of the tube shut. Let the actual sewing of the seam be approximately 1/2 inch above the pins, and this should allow plenty of wiggle room.

Step 7: Just as you trimmed the excess from the seam allowance in step 5, so you will trim the excess fabric from above the top seam. Use the same width of seam allowance as on the back of the tube--somewhere between 1/4 inch and 5/8 inch.

Step 8 (below): OPTIONAL Have the wearer try on the sewn-shut tube. At this point, if you like, you can adjust the shape of the tube to be more anatomically correct by flipping up the front of the hat until the tube sits comfortably on the head. Once the comfortable amount of front flip has been determined, mark the flip with a line of pins.
Step 9: If you did step 8, then in this step, you trim away the excess fabric from the front of the lining by trimming along the pinned line. You want to flip up and trim from the front, rather than the back so that you are not cutting through the back seam--cutting the back seam could possibly encourage that sewing in that seam to run out, while cutting in the front creates no problems at all. Remember, polar fleece fabric does not unravel.

Step 10 (below): You have now created a custom lining which will fit the wearer. At this point, you want to sew the lining into the hat. A polar fleece lining is sewn into a hat ONLY AT THE BOTTOM EDGE of the hat. There is no reason to sew it in along the top. By having the lining free-floating in the hat (attached only at the bottom edge) the hat will lay far smoother on the wearer's head than if the lining were attached at the top of the hat too.

Here is the how-to trick for pinning the lining evenly into a hat (or should I say--for pinning the HAT evenly inside the LINING!?)

Begin by turning the hat INSIDE OUT. Fit the lining OVER the hat, with the sewn seams of the
lining facing the inside of the hat. In other words,
  • the hat will be encased, inside-out, inside of the lining
  • the good side of the lining will be showing, and
  • the not-so-good side of the lining (the side with the seams) will rest against the inside fabric of the hat.
Align the back seams.


(If you think you may have seen this diagram before, you have! This is the identical diagram from the post on headband-style lining, and, in fact, the two methods are the same!)

a: Holding the hat (gray shape) inside the lining (blue shape), S-T-R-E-T-C-H the hat and the lining with both forefingers into a long shape which can be stretched no further. This automatically centers the hat inside the lining. Pin the lining to the hat in these two spots.

Do you wonder how you can pin in the lining while your hands are inside the hat and band, stretching everything smooth? You can ask someone to help you, of course, but if you are alone, you can take a shortcut by pinning in one contact point BEFORE you start the stretching-out process, then pinch the hat and lining together where you find the second contact should go. Just be sure not to prick yourself with the pre-set pin, which would go right against one of your stretching fingers.


b. along one side, divide the length between the two pins in half by again stretching the hat and the lining until they can stretch no further. Pin this third contact point.

c. along the other side, repeat step b. Four points are now pinned.

d. again stretching between two contact points, set a fifth contact point at the half-way mark between two already-set pins.

e. repeat the "stretching to find the half-way point" 3 more times until a total of 8 contact points are securely pinned down.

f. the perfectionists among us may want to again halve each side length for a total of 16 contact points.

Do not be alarmed if the lining is larger than the hat OR if the hat is larger than the lining. Once you have sewn the lining in place, the hat and lining will fit one another very well. The larger item, whether hat or lining, is eased to the smaller one by means of stretching out the smaller item as you sew, stitch by stitch, with the pins in place to divide the sections equally so all the ease does not wind up in one big lump on one side of the finished hat.

Thus, a too-large hat can be eased onto a smaller lining by stretching the lining out as the hat is stitched to it. When the sewing is done, the excess fabric of the hat will be distributed in tiny little bite-size pieces all around the lining. As the lining is released from stretching--as it shrinks back to near its original shape--it will take the too-large hat with it. Similarly, hats made of heavily textured fabric (ribbing, cables) will "draw in" much more than the smooth lining. Accordingly, the hat must be gently stretched to fit the lining.

To explain in different words: "Ease as you sew" is sewing jargon for stretching the smaller item (whether hat or lining) to match the larger item (whether lining or hat) as you sew the two together. When you have sewn the garment and the lining together and you take your hand away, you will see that they both lay smoothly together, regardless of the fact that the smaller one has been stitched into a new, stretched position.

As to which stitch to use, you can follow these instructions for the overcast stitch. I highly recommend sewing linings into knit garments by hand, rather than by machine: the end result is nearly always nicer, and the hand-sewn overcast stitch allows for a flexible and comfortable connection between the lining and the hat.

--TECHknitter (You have been reading TECHknitting on: "How to line a knitted hat.")

Thursday, June 19, 2008

Knitters have to eat, too (no-mess muffins)

Somehow, the recent lovely summer weather had put knitting out of mind. It may be heresy, but working with fiber has temporarily lost its appeal. Yet even when you put down your knitting, you still have to eat. Here is a recipe for no-mess banana muffins. There is hardly any clean-up and you can prepare ahead so you can pop these in the oven with very little delay.
The following recipe makes 12 standard size muffins.

Step 1: ZIPPER BAG
The trick to making these muffins no-mess is to use a zippered plastic bag. I keep a collection of recycled ones, slightly dusty or sticky, which previously stored dried goods like raisins or bread crumbs. These I re-use for projects like this one. 
step 2: GET READY
Put muffin papers (aka "baking cups") into your muffin pan and pre-heat your oven to 400 degrees.

Step 3: MIX DRY INGREDIENTS
Into your zipper bag, put
*1 3/4 cups of flour (white is tastiest, whole wheat pastry flour is a good runner-up)
*1/3 or 1/2 cup of sugar (avoiding white sugar? substitute the same amount of maple syrup BUT add the syrup to the wet ingredient in step 4)
*2 1/2 teaspoons baking powder
*1/4 teaspoon salt.
Seal the zipper, check the seal, then shake the bag until all dry ingredients are well-mixed.
step 4: BLEND WET INGREDIENTS
Into your blender, put
*1 banana (can be a super-ripe one you no longer care to eat)
*1 egg (vegan? substitute 3 oz tofu)
*1/2 cup milk (diary milk or soy milk, makes no difference)
*1/4 cup oil (avoiding oil? substitute 1/3 cup applesauce for the oil)
Whirl this mixture around until smooth. If substituting maple syrup for sugar, add the syrup in this step.
step 5: COMBINE WET and DRY INGREDIENTS
Open the zipper bag, pour the blender contents in, and re-seal bag, pressing out as much air as possible. Mash the mixture together, working the dry ingredients out of the corners. TIP: Radically reduce your clean-up time by taking a minute to fill the blender body 1/3 full of water, add a few drops of dish soap and run the blender at high speed until it fills with suds. Then, let the blender sit there soaking until you have the muffins in the oven.

Step 6: PARTIALLY FILL MUFFIN TINS
Work the muffin batter into the bottom the zipper bag by repeatedly drawing the bag between thumb and forefinger. When the mixture is at the bottom, open the zipper to allow in air. Reseal the zipper, test the seal, gather the top of the bag in your non-dominant hand and twist it several times, then tilt bag and squeeze gently so the air bubble is pressing the batter into one corner of the bag. With a scissors, cut the tip off the corner, lopping off about 3/4 inch along the long edge of the cut. Gently squeeze a small amount of batter into each of the muffin papers.
step 7: ADD YUMMIES
Lay the bag of batter aside, cut tip up, so it does not ooze batter onto the counter. Into the batter in the bottom of each muffin paper, press whatever yummies you think would be good--walnuts, pecans, raisins, dried cranberries, dried cherries, dried blueberries, diced dried apricots, whatever.

step 8: FINISH FILLING MUFFIN PAPERS and BAKE
Press equal amounts of the remaining batter into each muffin paper, then bake in a pre-heated oven at 400 degrees until done (about 12-15 minutes). If unsure, test with a cake tester or a toothpick. Let the muffins cool in the tin. If you insist on eating them hot, the bottom crusts will stick to the papers, but once cool, the papers can be drawn off without too much loss of muffin.

RECAP:
*Preheat oven to 400 degrees
*Line muffin tin with muffin papers (no need to grease them)

INGREDIENTS:
*1 3/4 cups of flour
*1/3 or 1/2 cup of sugar
*2 1/2 teaspoons baking powder
*1/4 to 1/2 teaspoon salt.
*1 banana
*1 egg
*1/2 cup milk, adding a couple of tablespoons if either the banana or the egg is small.
*1/4 cup oil

OPTIONAL YUMMIES:
*chopped nuts, any kind
*raisins or dried fruit

METHOD:
* mix first 4 ingredients in a plastic zipper bag--these are the "dry ingredients"
*blend together banana, egg, milk, oil --these are the "wet ingredients"
*combine wet and dry ingredients in the zipper bag, exclude air from bag, then mash dry and wet ingredients together until fairly uniform
*work mixture to bottom of bag, open bag and let in a big air bubble, then reseal the bag
*cut one corner off zipper bag, and, using the zipper bag as a pastry bag, squeeze small amount of batter into each prepared muffin paper
*add optional ingredients (nuts, raisins, etc)
*finish filling muffin papers

*Bake at 400 degrees until tops are brown and cake tester comes out clean (12-15 minutes).
*Let cool for easiest unwrapping.

As you can imagine, it is possible to mix together the dry ingredients the night before, so all you have to do for breakfast muffins is pop the wet ingredients into the blender, then pour those into the bag in the AM. Heck, you can keep several ready-made bags of muffin mix in the pantry, so you can have muffins any time you like.

At clean-up time, your muffin pan isn't usually messy because you didn't grease the papers, and the squeezing trick helps avoid dribbling batter onto the tin. The zipper bag gets tossed. The blender is a very quick wash-up if, as soon as you empty the blender, you take a minute to fill the blender with a little water, a few drops of soap and then a quick whirl to fill the blender with soap suds. In fact, with this pre-soaking method, there is usually no wash up of the blender at all--just a rinse.

--Good appetite from TECHknitter (You have been reading TECHknitting on: "no mess muffins")

Saturday, June 7, 2008

Knitting helps science

Ladies? Next time someone looks down on your knitting? Just send them here.

Friday, June 6, 2008

How to make tassels

Tassels are very similar to pom-poms. They are a good trick to know because they use substantially less yarn than most pom-poms, and go quicker, too. Shown here are basic tassels, but you can really jazz these up quite a bit--you can put a bead or a bit of stuffing in the top part, you can wrap two or more "top parts," the variety is endless, and tassel-making is actually a fine and ancient fabric art in its own right. However, basic tassels look swell too, and make a very fine hat topper in just a few moments.

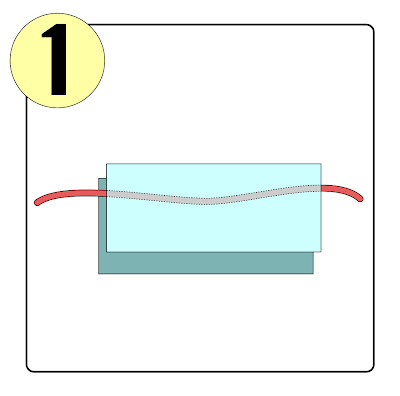
step 1 (above) get 2 pieces of straight cardboard and sandwich a yarn between (red in the illustration). The height of the cardboard corresponds to the overall height of the tassel. Although the illustration shows two pieces of cardboard, one double-height piece, folded over, works nearly as well.

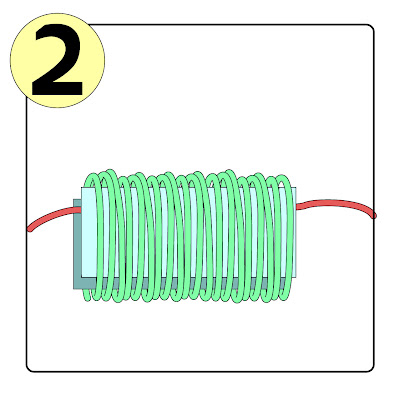
step 2 (above) Wrap yarn (can be scraps) around and around the cardboard. The more yarn you wrap, the bushier the tassel will be. Yet, sparse tassels have their own charm so even if you have very little yarn left, a tassel is a good way to use it up.

step 3 (above) This is where it would be good to have an extra set of hands. You must pull the tie-yarn up from the middle of the cardboard, and cut the bottom of the tassels free. Lacking extra hands, pressing the works against the tabletop while cutting helps prevent the cut yarns from springing about and showering the room with stray ends. If you are using the lazy-knitter trick of folded cardboard, you pull the tie yarn to the open edge and cut the tassel open along the folded edge.

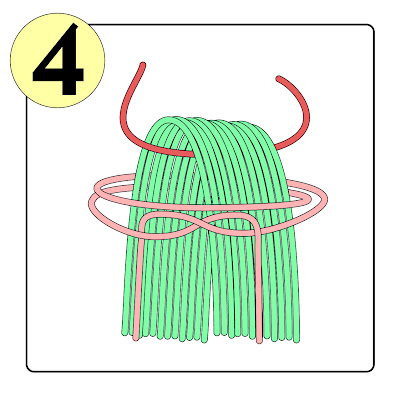
step 4 (above) Take a length of yarn (pink in the illustration) and wrap it around the nascent tassel FIRMLY. The illustration shows two wraps, but 5 or 10 wraps is more common (although harder to illustrate!) Most common is to use a yarn of the same color. A contrasting color yarn (as shown) is more for illustration.  If you like, you can do step 5 before step 4, which gives you more control over all the loose ends.

step 5 (above) Tie the center cord tightly, and use the tails from the center cord to attach the tassel. Some folks like the tassel to swing on the end of its own little cord, in which case you sandwich in a L-O-N-G center cord in step 1. After tying the center cord to make the tassel, you can chain-crochet or repeatedly knot together the two ends of center cord to the desired length before attaching the tassel to the hat (scarf, afghan, lap robe, sweater tie, etc). If you find that the tassel-ends are unraveling, you can knot the ends, as shown in the last illustration of this post.

One last thing: It is also possible to make tassels from I-cord, which follow the same basic principle, but result in a different look. Click here for more details.

--TECHknitter (You have been reading TECHknitting on: "How to make a tassel")