Monday, February 27, 2012

The sheepseye buttonhole, also called the "yarn over buttonhole" (part 3 in a series)

This post--the third in a TECHknitting series on buttonholes*--shows how to make the sheepseye buttonhole.  Some folks call this buttonhole the "yarn over buttonhole," but I don't, because you can make a smaller, tighter version of this same buttonhole by skipping the yo altogether.

Sheepseye (aka "yarn over") buttonhole 


Row 1: a k2tog (red) is followed by a yo (black), then work as your pattern requires, to the end of the row.  Turn work.
Row 2: work all stitches including the yo, in the fabric called for by your pattern.

When you keep making these, spaced out as required, and always in the same column as you knit, the resulting is a line of little round buttonholes up the front band of a sweater. Although rather rough, this “sheepseye” buttonhole is remarkably easy to work and has the distinction of being the smallest buttonhole which can be worked in a given fabric—a good match for the small buttons suitable to delicate work or baby garments. 


Tightening the sheepseye by skipping the yarn over
For tighter sheepseyes, skip the yo.  Here's how:
Row 1: K 2tog.  Next, place a safety pin around (not through!) the yarn after the k2tog.  Work the following stitches as you usually would. Turn work
Row 2: Work as pattern requires.  When you get to the place where the pin is, use the pin to lift the “bar” onto your L needle, remove the pin, then knit the bar. Continue working the remainder of the sts as called for by your pattern.

If row 2 makes no sense to you, no worries: here is a fuller description.  When you get to where the pin is, pull up on the pin.  You'll see that you're pulling on a sort of a loop which arises between two stitches.  This loop is called a "bar." Deposit the bar onto the left needle. Next, remove the pin and you will see that you've created a sort of an afterthought yo, pulled up out of the yarn in the row below.  This trick is sometimes called "lifting a bar." Knit into this bar just as if it were a yo, then knit the rest of the sts as usual.

Here's why this trick works:  if you HAD made a yo, you would have added that amount of yarn to your fabric. By skipping the yo and lifting a bar from the row below instead, you are pulling slack out of an already-knit fabric.  This forces the fabric to tighten.  By knitting into this bar, you are creating a hole in the same place as it would have been had you made a yo, but it is a smaller hole than you ever could have knit using a yo--perfect for small slippery round buttons, such as pearl buttons, for example. Knitting into the bar also corrects the st count just as if you'd knit into a yo made in the previous row.

Nifty, ay?

Two caveats:

  • When you lift the bar to form the afterthought yo, lay it on your left needle oriented the same way as if it were an actual yo (look at the orientation of a yo made on a swatch for comparison).  Work into this bar-yo without twisting it.  In other words, do not twist the hole shut by knitting into the back of the lifted bar, thus criss-crossing the st shut over where the hole should be. 
  • Try both the yo way and the non-yo way of making these buttonholes on a swatch, then try pushing through the button you're planning to use.  No sense in over-tightening the buttonhole so the button no longer slides through.

* * *

Good knitting!--TK

PS: There is a new (September 2013) YO (eyelet) buttonhole which is reinforced, a better choice if you need sturdier version. Have a look!   Thanks to Ellen at at Pile of Sheep Blog for this new trick. 

Sunday, February 26, 2012

Instead (a poem for a lazy Sunday)

On the receding cusp of Sunday now-ness
three ways beckon

Laundry?
Nap?
Knit a mitten?

No.
A poem instead

--TK

Thursday, February 23, 2012

Button lore (part 2 of button holes for hand knitters series)

This is the second post in a TECHknitting series on buttonholes in hand knitting.*  The first post covered lore and tradition about buttonholes, plus some nifty tricks. Today, some background information about the buttons themselves, as well as how to sew them on.

Buttons, shanked and unshanked
It is evident that a buttonhole must be large enough to allow the button through without straining, yet not so large that the button pops loose when you breathe. Less evident, perhaps, is the relationship between the thickness of the band and the height of the button shank.

Buttons come in two kinds: shanked and unshanked.   Shanked buttons are the kind with a little stem on the button back.  Unshanked buttons feature sewing holes which go right through them.  When using an unshanked button on hand-knit, it is wise to create a thread shank as the button is sewn on. Matching shank height to band thickness helps prevent puckering and undue wear from a too-short shank, or drooping from a too-long shank.


Thread shanks
To make a thread shank on an unshanked button, insert a spacer (traditionally a matchstick or a toothpick) between the button and the button band, before sewing down the button. Go to this post for a nifty new trick for holding the spacer in place as you sew.

Continue sewing the button. When the sewing is complete, remove the spacer. As the last step before knotting off the thread, bring the threaded needle up between the buttonband and the button, then reinforce the shank you've made by winding several times around the sewing threads. Whether you create the shank from thread or whether the button comes shanked, match the shank height to the thickness of the buttonhole band: a button shanked high enough for a heavy woolen sweater-coat will droop and wobble if buttoned through a thin summer sweater.


Anchor buttons
For a heavy button which wants to droop regardless, consider an anchor button on the inside of the buttonband.  An anchor button distributes the weight of a heavy button, and help keep it upright.  Conversely, anchor buttons also work well on thin or delicate fabrics: they distribute the weight of the main button, take the strain and prevent ripping at the attachment-point.

Both the main button and the anchor button are sewn at the same time, using the same thread and needle. The main button is shanked-- either by being a shanked button in the first place, or by sewing it on with a thread shank.  By contrast, the anchor button is sewn on flat because it is non-functional (it does not go through a buttonhole).


Good knitting!--TK
__________________

*(Posts in this series)
.Buttonholes in hand knitting, part 1: lore and tradition plus some nifty tricks 

 (Related posts)

Monday, February 20, 2012

Button holes in hand knitting, part 1: Lore and tradition plus some nifty tips

This is the first post in a multi-post series on buttonholes.*  Some of this material has appeared in print in Interweave Knits, some of it is brand new. This first post covers the lore and tradition of buttonholes, as well as offering some nifty general tips. 

Which side? 
Tradition puts men’s buttons on the right band and buttonholes on the left, with women’s clothing opposite: buttons left, buttonholes right. Do you wonder why? At certain periods in history, women’s clothing became so elaborate, assistance was required in dressing. Buttonholes on the right are easier for a right-handed assistant facing the wearer (although not for the wearer herself!)

Girl? Boy? Don’t know? 
If gender traditions are important for you, here's a nifty trick. For baby sweaters, make buttonholes on both sides, but leave off the buttons.After the birth, sew the buttons on over the “wrong-side” buttonholes. This closes the unneeded buttonholes, yet permits switching for a future sibling of different gender.

Perfect spacing, no math
Cut a piece of sturdy no-stretch string about 1 inch shorter (for really big buttons, maybe 2” shorter) than the proposed button band. Determine desired number of buttons, then subtract 1 from that number and fold the string into that number of sections. Example: for 5 total buttons, 5-1=4, so fold the string into 4 equal sections. Mark each of the three resulting folds with a pin. Straighten the string. The top and bottom button are to be centered on the very ends of the string, and the intervening three buttons are to be centered on each pin in the string segment. Measure each string segment to figure out how many inches of band to allow between the holes. If using vertical buttonholes, remember that the pin shows the buttonhole center, not bottom so start the actual buttonhole accordingly.

Horizontal or vertical? 
Ever wonder why some sweaters have top and bottom buttonholes horizontal, and intermediate buttonholes vertical? Horizontal buttonholes prevent vertical slippage, keeping bands aligned top and bottom.Vertical buttonholes prevent horizontal slippage, keeping the bands centered on one another. This two-way alignment is found on high-end sweaters, and adds a touch of class to hand-knit sweaters, too. A further refinement: Horizontal buttonholes are worked so the outer edge not the center of the buttonhole!) is centered on the buttonhole band. Why? When wearing, the button pulls to the outside of the slot. This off-center placement keeps the bands aligned.

Buttonholes and their bands
Buttonhole bands and button bands are best made in a non-curling fabric (i.e.: NOT stockinette). Horizontal buttonholes work well in a row-structured (horizontal) fabric, such as garter stitch, while vertical buttonholes work well in a column structured (vertical) fabric, such as ribbing.For two-way alignment, something’s got to give, so swatch it out both ways and see whether you prefer horizontal holes in a vertical fabric or vice-versa.

--TK
______

*(Posts in this series)
.Buttonholes in hand knitting, part 1: lore and tradition plus some nifty tricks 

 (Related posts)


Wednesday, February 15, 2012

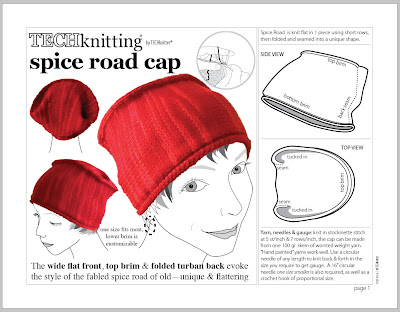
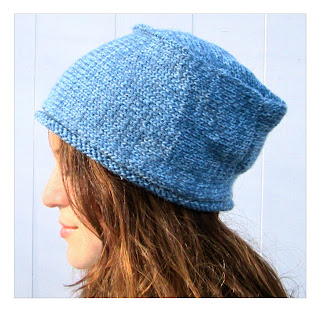
Spice Road Cap: a TECHknitting pattern

Pattern cover (click to enlarge)
The spice road--stretching from China, through central Asia to easternmost Europe-- defined the route precious spices and silks traveled from east to west. The headgear along the road varies from the fur headgear of the steppes to the brimmed hats of central Asia to the turbans of the southern fringe. The Spice Road Cap captures this variety. A wide flat sweep rises over the forehead, a little foldover brim runs around the top and an organic back fold brings turbans to mind.


Spice Road cap

The cap is knit flat in a fan shape then bound off and folded. There is no needle-and-thread sewing.  Instead, the back seams are three-needle bind offs, and the bottom brim is picked up and knit on. Short rows and slip stitching are used in the shaping, and the pattern contains tutorials for these.

Spice Road fits close to the head at the ears.  Yet, there is positive ease above the ears caused by the unique brim shaping, so a high bun would fit. The cap folds up small and would be easy to take along in a pocket or handbag until needed.


Spice Road takes just under 100 grams of worsted weight wool.  Knit at a gauge of 5 st/in and 7 rows/inch, the cap requires a 30 inch or longer circular needle of the size you require to get gauge.  A second, 16" long circular needle two sizes smaller is required for the bind off and the lower brim, and a crochet hook is required for the slip-stitching and picking up stitches. One size fits most, and the finished diameter can be customized by the number of stitches picked up for the lower, curled, brim.


There are two ways to purchase this pattern
1. Go to the Ravelry page for this cap
2. Purchase now--with this button --->

Good knitting, and I hope you will like the cap--both knitting it and wearing it.
--TK

PS:  Thanks to the test knitters!